Let’s really get into mycology by creating some agar plates for growing live edible mushroom mycelium. In the first part of this series, we looked at some reasons you might want to start growing your own edible mushrooms at home. If you haven’t read that article, you can read it here. Now let’s take a look at some of the things you need to do to grow and harvest edible mushrooms at home if you want to go beyond buying a grow kit from a supplier.
The Not-So-Easy Method
This method is not for the faint of heart. It involves multiple steps and requires both a knowledge of sterile technique and a pressure cooker for sterilization. If you aren’t comfortable with these, then order a ready-to-grow kit.
If you are ready to learn more about growing edible mushrooms and the steps involved continue reading to learn how to create agar plates and grow mycelium we will use to inoculate grain spawn in the next step.
The First Step
The first step to growing mushrooms at home is to choose how you will start the mushroom growth cycle. There are a number of ways to do this. One is to purchase a spore print from a dealer and inoculate agar cups with the spores. Another is to purchase a liquid culture syringe that contains live mushroom mycelium from a dealer. This is the method I chose for my foray into attempting to grow mushrooms at home.
I found a dealer selling blue oyster and shiitake liquid culture syringes and ordered one of each. My research suggested that oyster mushrooms are the easiest for beginners to grow, so I started with those first.
I wanted to do this experiment by making use of low-tech techniques that anyone could do without a huge investment. Large mushroom farms use equipment such as laminar flow hoods with HEPA filters and autoclaves, which can require a significant investment of capital. I researched methods that allow growing mushrooms using much simpler tech. Below I lay out the methods I used to start growing and harvesting mushrooms with very little cash outlay. Now we need to make agar plates for growing the mycelium to use to inoculate the grain spawn.
Once the liquid culture syringes were shipped to us, the next step was to make agar cups to grow out the mushroom mycelium for further use.
This is not a totally necessary step in the process. You could simply purchase liquid culture syringes and use them to inoculate your grain spawn. However, if you want to ensure you can continue your genetic line you may want to grow some mycelium on agar and store them in the fridge to ensure you don’t lose your genetics because of contamination or some other issue.
I also found that by experimenting with both methods, mycelium growth on the grain spawn really took off 2-3 days sooner when inoculating grain spawn with the mycelium grown on agar plates versus direct inoculation of liquid culture to the grain spawn. I’ll cover using liquid culture techniques in a future article.
Making Agar Plates
I found this agar recipe online so I can’t take credit for it. This recipe calls for a 3-2-1 concentration of ingredients. That makes it easy to remember when creating your agar plates.
The agar recipe is 3 parts potato flakes, which you can find at your local grocery store. Add 2 parts agar powder. Agar powder is a thickening agent similar to gelatin which is made from red algae. The final ingredient is 1 part light corn syrup. Below is an example recipe:
- 3 grams of potato flakes
- 2 grams of agar powder.
- 1 gram of light corn syrup
- 125 ml filtered water
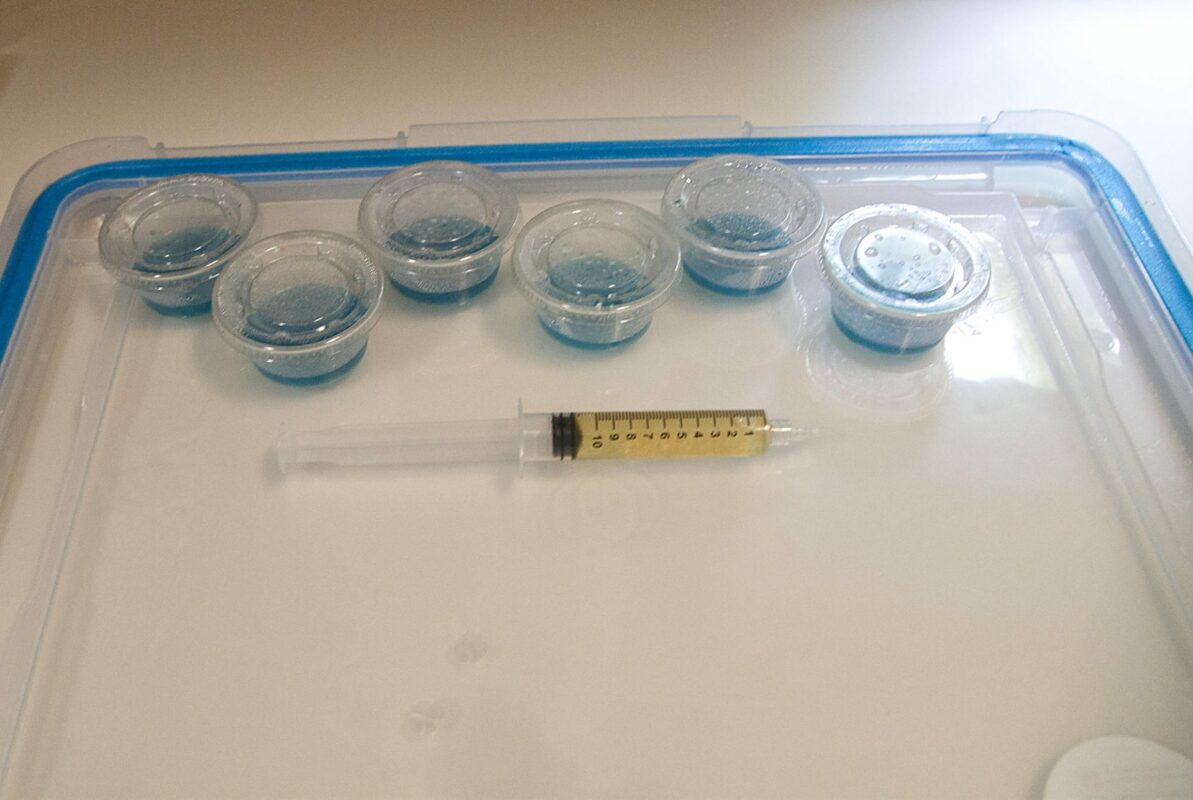
Add 3-4 drops of blue or red food coloring to the agar mixture before you sterilize it to help you see the mycelium as it starts growing, and to help spot any contamination. This recipe can be increased to make as many agar cups as you like. But you don’t have to purchase expensive Petri dishes. I made mine using plastic condiment cups with a snap-on lid, which you can also purchase here if you can’t find them locally.
Mix all the ingredients together and pour the mixture into a canning-safe jar. Place the jar into a pressure canner and sterilize at 15 psi for 30 minutes. Let the mixture cool after you remove it from the pressure canner. It needs to be warm enough that it has not set and is still liquid. But it can’t be so hot that it melts your plastic cups. When you can hold the jar in your hands to pour the mixture the temperature is about right. This is around 185° F.
You will need a still air box or laminar flow hood for pouring your agar cups to prevent contamination. I chose to use a still air box due to the small cost versus a laminar flow hood. A still air box can be purchased here, or you can make your own, like I did, using a large plastic storage bin and cutting two holes for your hands to access the box. You can use a 4″ hole saw to cut two holes on one side of the still air box for you to access the things you are working with inside the box. I purchased the storage bin I am using from a dollar store for around $11.
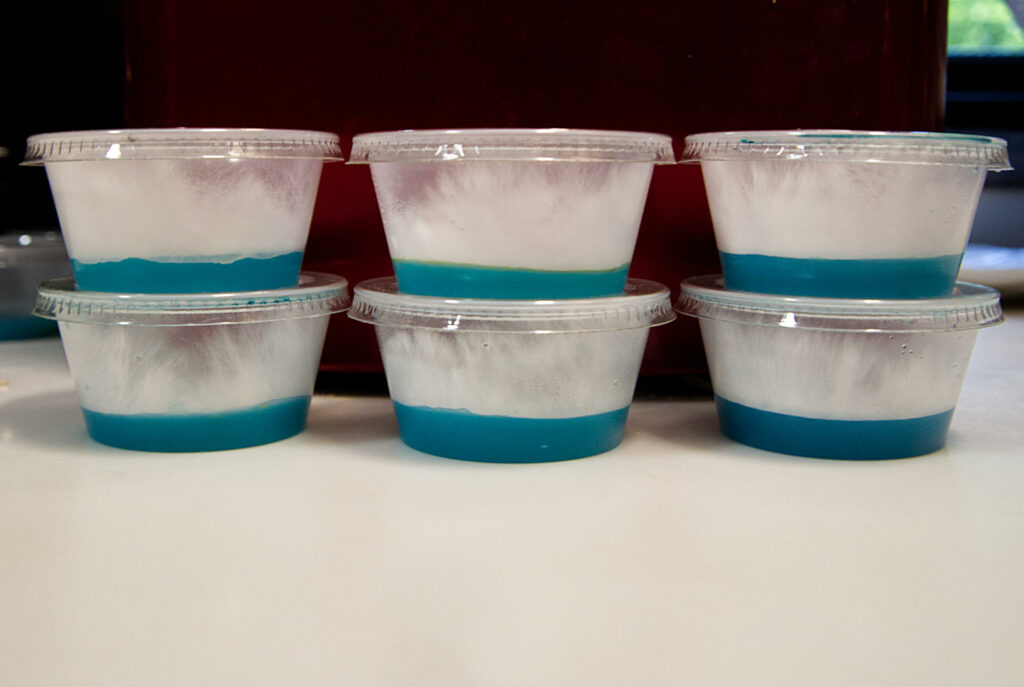
Once you have poured the agar cups let them sit and cool overnight on a counter. If the agar is too hot it will kill the live mycelium. Another trick I learned is to stack the cups on top of each other. This helps prevent condensation on the cup lids as they cool. Once they cool and set, you are ready to inoculate the agar growing medium.
After you have sterilized the agar solution you have a potent food source for the mushroom mycelium to grow on. But you also have a food source for contamination as well. There are billions of spores all around you that will find the agar a perfect environment to grow too. Since we want to prevent contamination from these unwanted organisms we need to transfer the agar using sterile technique. Or at least as sterile as possible. This makes cleaning EVERYTHING you will be using a total necessity.
Clean all the surfaces of everything using 70% isopropyl alcohol. Use a fine spray bottle and spray everything that will go inside the box, including the still air box. Spray the inside and outside of the still air box. Use a paper towel and wipe down everything to make sure the alcohol gets to all surfaces. Spray and wipe down the counter where the box will be sitting. Spray down anything that will be used inside the box. Spray the inside and outside of your cups with alcohol. Place everything you will need inside the box before you place the cover on the still-air box.
Wear disposable gloves and wipe them down with alcohol, as well as your forearms that will be inside the box. You should also take a shower before working in the box to help minimize contamination. Remember, at this stage of mycology work, being as clean and sterile as possible is the name of the game. You can never be too clean when working at this stage of growing mushrooms. If you need to remove your hands from the box, spray your gloves and forearms again before placing them back inside the box.
Once you have everything clean you can inoculate the cups by shaking the liquid culture syringe vigorously to help break up the live mycelium in the syringe and distribute it throughout the solution. Open the cup just enough to inject 1 ml onto the agar and quickly close the cup lid. Do this for all cups and check to be sure the lids on the cups are firmly closed. You can then place them in an area without direct sunlight. In about 5-7 days you should see mycelium growing as white tendrils that will become a white and fluffy mass as it grows.
When the mycelium has grown out on the agar plates you can use it in the next step to inoculate grain spawn. This will be covered in the next article.
Be sure and check out all the informative articles on our Natural Living Blog.
FAQs:
Q: What kind of agar plate do you use for mushrooms?
A: Agar plates used for mushrooms typically contain a mixture of nutrients and supplements designed to support fungal growth. Commonly used agar types include Potato Dextrose Agar (PDA) and Malt Extract Agar (MEA).
Q: How do you make agar plates for mushrooms?
A: To make agar plates for mushrooms, a mixture of agar powder, water, and nutrients is sterilized and poured into Petri dishes. The mixture is then allowed to cool and solidify before being inoculated with mushroom spores or mycelium.
Q: What agar is best for fungi?
A: Potato Dextrose Agar (PDA) is a common and effective agar for growing a wide range of fungi, including many edible and medicinal mushroom species.
Q: Will mycelium grow on plain agar?
A: While mycelium may grow on plain agar, it is generally recommended to use an agar medium that contains nutrients and supplements specifically designed to support fungal growth.
Q: What is the best media for mycelium?
A: The best media for mycelium depends on the species of mushroom being grown. Commonly used media for mycelium growth include liquid culture, agar plates, and grain spawn.
Q: How long can mycelium live on agar?
A: Mycelium can live on agar plates for several weeks or even months if properly maintained and subcultured.
Q: How long does it take for mycelium to start growing on agar?
A: The time it takes for the mycelium to start growing on agar plates can vary depending on the species of mushroom and other environmental factors such as temperature and humidity. Generally, it can take anywhere from a few days to several weeks for the mycelium to become visible on agar.
Q: How long does it take for mycelium to fully colonize?
A: The time it takes for the mycelium to fully colonize a substrate can vary depending on the species of mushroom and other environmental factors such as temperature, humidity, and substrate composition. Generally, it can take anywhere from a few weeks to several months for the mycelium to fully colonize a substrate.
Q: At what temperature does mycelium stop growing?
A: The temperature at which mycelium stops growing can vary depending on the species of mushroom. However, many species stop growing at temperatures above 80-85°F (26-29°C).