Embark on a journey of culinary delight and sustainable gardening with our comprehensive guide to Shiitake Log Inoculation. Discover the art and science behind cultivating exquisite shiitake mushrooms in your own space. From selecting the right logs to mastering the inoculation process, our expert insights will equip you with the skills to create a thriving shiitake oasis in your backyard.
Understanding Shiitake Log Inoculation
Mycelium
Mycelium, often referred to as the “root system” of mushrooms, is a complex network of fine, thread-like structures that plays a pivotal role in the entire lifecycle of mushroom growth. Serving as the vegetative part of the fungus, mycelium functions as both a nutrient absorber and a key player in breaking down organic matter.
Upon successful inoculation, mycelium begins to colonize its growth substrate, which could be a variety of materials such as wood, soil, or compost. As the mycelium expands, it secretes enzymes to break down the substrate’s organic compounds into simpler forms, facilitating nutrient absorption. This process not only provides the mushroom with essential nutrients but also contributes to the decomposition of organic matter in the ecosystem.
The mycelium’s growth and nutrient absorption pave the way for the later stages of mushroom development. When environmental conditions are conducive, the mycelium undergoes a shift, signaling the formation of fruiting bodies – the mushrooms themselves. These fruiting bodies emerge as the mycelium channels its energy into the reproductive phase. Through a fascinating interplay of biological triggers, the mycelium transforms into the recognizable cap-and-stem structure, completing the life cycle.
In essence, mycelium serves as the foundation for mushroom growth, facilitating the absorption of nutrients, breaking down organic matter, and orchestrating the transition from vegetative growth to reproductive fruition. Understanding the pivotal role of mycelium provides a deeper insight into the intricate and captivating world of fungi, offering a glimpse into the symbiotic relationship between these organisms and the environment they inhabit.
Connection Between Shiitake Log Inoculation and Mycelial Growth
Shiitake log inoculation and mycelium colonization are two interconnected stages in the process of growing shiitake mushrooms on logs. Understanding this connection is key to successfully cultivating a bountiful harvest of these delectable fungi.
Shiitake log inoculation is the deliberate introduction of shiitake mushroom spawn (a substrate infused with shiitake mycelium) onto prepared logs. This step initiates the cultivation process by introducing live mycelium into the log. The spawn acts as the starting point from which the mycelium will expand and colonize the log’s interior over time.
Mycelium colonization refers to the process in which the shiitake mycelium spreads and infiltrates the log. As the spawn comes into contact with the log’s interior, the mycelium begins to grow and propagate throughout the log’s substrate. For shiitake mycelium, the preferred substrate is hardwood logs. It secretes enzymes that break down complex organic compounds within the wood into simpler nutrients that the mycelium can absorb. This colonization phase is crucial as it establishes the mycelium’s network within the log, setting the stage for future mushroom development.
The connection between shiitake log inoculation and mycelium colonization is fundamental. Inoculation is the intentional introduction of live mycelium into the log, jumpstarting the colonization process. The mycelium then takes hold, spreading its network within the log and establishing its presence. This colonization is essential for several reasons:
- Nutrient Absorption: The mycelium’s expansion and colonization enable it to access and absorb nutrients from the log’s substrate. This nutrient acquisition sustains the mycelium’s growth and provides the foundation for future mushroom development.
- Mycelium Network Formation: Colonization creates an intricate network of mycelial threads throughout the log. This network serves as a pathway for nutrient transport, enabling the mycelium to thrive and eventually develop mushrooms.
- Mushroom Formation: As the mycelium network matures, it reaches a stage where environmental conditions trigger the transition from vegetative growth to reproductive growth. This leads to the formation of fruiting bodies – the shiitake mushrooms – as the mycelium channels its energy into producing these structures.
Preparing for Shiitake Log Inoculation
Before shiitake cultivation can commence, the initial steps play a crucial role in determining the success of the inoculation process. In this section we explore the art and science of preparing for shiitake inoculation, ensuring that the logs are primed to become a thriving habitat for shiitake mycelium.
Selecting the Right Logs: The foundation of a successful shiitake cultivation endeavor lies in the careful selection of logs. Hardwood logs, such as oak, maple, and beech, are the preferred choice due to their durability and nutrient content. Logs should ideally be 8 inches or more in diameter and cut from healthy, disease-free trees. Larger logs tend to retain moisture better, promoting optimal mycelium colonization.
Aging and Conditioning: Logs, once chosen, must undergo an aging process to mimic the natural decay that occurs in the forest, which creates a hospitable environment for shiitake mycelium. Aging involves letting the logs rest for several weeks to let the natural antifungal agents produced by the tree while it was alive to diminish.
Log Pre-Soaking: Before inoculation, pre-soaking the logs becomes an essential step in recreating the humidity that encourages mycelium growth. Soaking the logs in water for 24 to 48 hours rehydrates the wood, making it more receptive to the shiitake spawn. This moisture triggers the release of nutrients, making them available for the growing mycelium.
Creating Inoculation Sites: To create the ideal points of entry for the shiitake spawn, the logs are drilled with holes. These holes provide the mycelium access to the log’s interior. The holes should be drilled slightly larger than the size of the hardwood dowels we use for inoculation. This allows for contact between the interior wood surface and the mycelium. The spacing and pattern of the holes should be thoughtfully planned, ensuring optimal colonization throughout the log. Most people use a diamond pattern and space the rows of holes around 4-6 inches around the diameter of the log.
Tools and Materials: A set of essential tools and materials are necessary for the inoculation process. This may include a drill with the appropriate size bit, wax (I use beeswax), and a brush for sealing the inoculation sites after the spawn is introduced. These tools ensure that the logs remain sterile, preventing contamination that could hinder mycelium growth.
Step-by-Step Guide to Shiitake Log Inoculation
Step 1: Log Selection
Begin by selecting hardwood logs, such as oak or maple, with diameters 8 inches or greater. Opt for healthy, disease-free logs that have been aged for a few weeks to let the levels of natural antifungal agents within the logs dissipate. Don’t use logs that look diseased or use dead logs that are missing or shedding bark. Also, try and avoid using logs that have been lying for over a month or more. These logs will have already been inoculated with competing fungi that may overpower your mycelium before it can become established.
Step 2: Log Aging and Conditioning
Allow the chosen logs to age and condition for several weeks, if possible. This mimics the natural decay process and prepares the logs by breaking down complex compounds into accessible nutrients. Using fresh logs also assures that the log will not dry out too much before the inoculation process.
Step 3: Log Pre-Soaking
Pre-soak the logs in water for 24 to 48 hours. This rehydrates the wood, creating a hospitable environment for the shiitake mycelium to thrive and facilitating nutrient release. You will need to place heavy weights on the logs to keep them submerged during the pre-soaking period.
Step 4: Creating Inoculation Sites
Using a drill and an appropriate size bit, carefully create holes in the logs. These holes serve as entry points for the shiitake spawn to colonize the log’s interior. Plan the spacing and pattern of holes thoughtfully for even colonization.
Step 5: Introducing Shiitake Spawn
Take your shiitake spawn dowels and place one into each hole. Ensure the spawn dowels are slightly below the level of the bark on the log. This allows you to place the hot wax in the next step over the hole without it running off the log and wasting wax.
Step 6: Sealing Inoculation Sites
Using melted beeswax, seal the inoculation sites to prevent contamination and retain moisture. Apply the wax using a brush or syringe, ensuring each hole is securely covered. I prefer to use 10cc syringes as they are easier for me to work with. The melted wax can be easily drawn up into the syringe and carefully injected over the dowel to seal the holes.
Step 7: Log Storage and Monitoring
Place the inoculated logs in a shaded area with good air circulation. Monitor the logs regularly for signs of mycelium growth. Be sure and monitor the logs for moisture. During dry spells, you may need to spray down the logs with water to maintain the moisture level in the logs.
Step 8: Mycelium Colonization
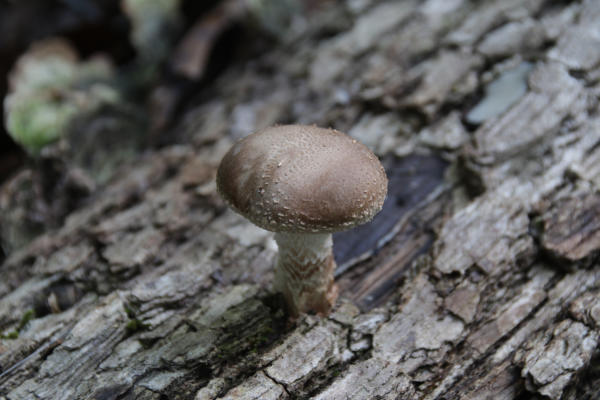
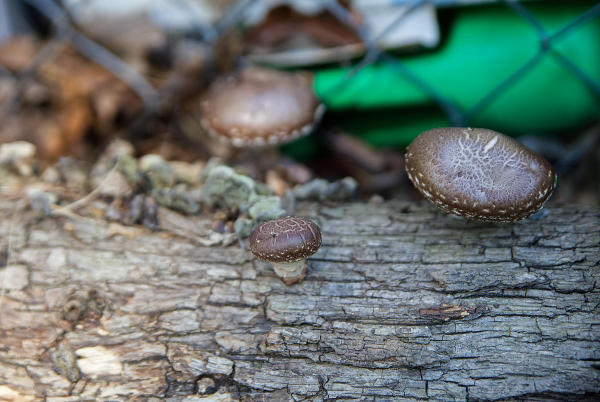
As mycelium colonization progresses, the logs will show white mycelial growth around the ends of the logs. This is a positive sign that the mycelium is thriving and spreading throughout the log.
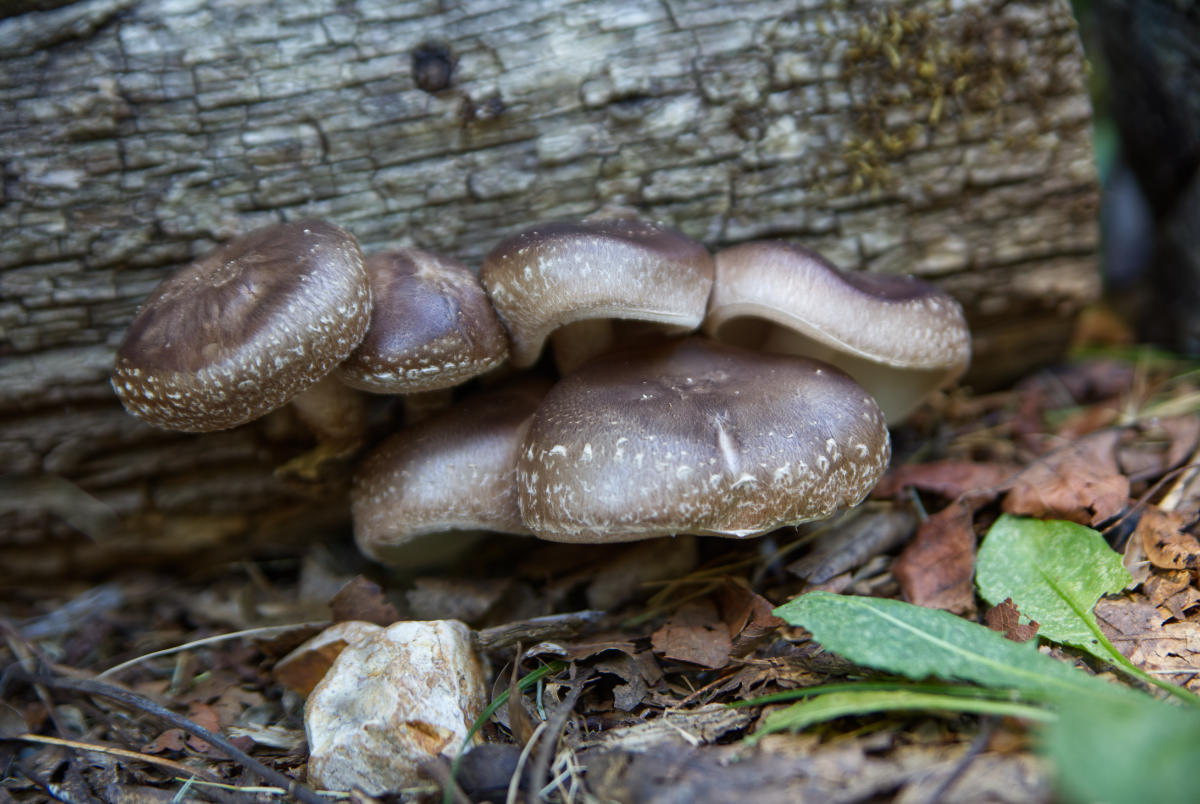
Step 9: Fruiting Stage
Once the mycelium has colonized the logs, they will enter the fruiting stage. With shiitake mushroom logs this will typically happen in 12-18 months. Fruiting will typically happen as the weather changes in the early Spring and late Autumn. Once the logs begin fruiting they can typically be expected to fruit for up to 8 years or more from the same log.
Creating an Optimal Growing Environment
Understanding the Role of Environmental Factors: Mycelium colonization is profoundly influenced by the interplay of various environmental factors. These factors work in harmony to determine the pace and success of mycelium growth, directly impacting the eventual harvest of shiitake mushrooms.
Humidity Management: Adequate humidity is a crucial element. Mycelium requires moisture to thrive, but excessive humidity can lead to contamination issues. Aim for a humidity level of around 90% in the early stages of colonization. If conditions are excessively dry place a tarp or other cover loosely over the logs to help retain moisture while still allowing proper airflow. As the mycelium becomes established, you can gradually reduce humidity levels to prevent mold growth.
Light Considerations: Shiitake mycelium is photophobic, meaning it prefers darkness. While some light exposure is inevitable, especially during maintenance, avoid exposing the logs to direct sunlight. Indirect or ambient light is sufficient, and shaded areas are ideal for log storage during the colonization phase.
Air Circulation: Proper air circulation is essential to prevent the buildup of carbon dioxide around the logs. Adequate airflow ensures that the mycelium receives the oxygen it needs for healthy growth. Positioning the logs in a well-ventilated area and spacing them appropriately contributes to a conducive environment.
Maintaining Ideal Conditions: Creating an optimal environment for mycelium colonization requires diligence and monitoring. Regularly check the logs for signs of contamination, unusual smells, or excessive moisture. Adjust humidity and ventilation as needed to maintain the delicate balance that encourages steady mycelial expansion.
Signs of Successful Colonization: As mycelium colonization progresses, you’ll notice the emergence of white mycelial threads around the inoculation sites or at the cut ends of the logs. This is a positive indication that the mycelium is thriving and spreading within the logs. The steady progression of colonization over time is an exciting milestone on your shiitake cultivation journey.
Post-Inoculation Care
Attention and careful maintenance become instrumental in ensuring the health and prosperity of the shiitake mycelium as it establishes its presence within the logs. This post-inoculation phase marks the bridge between inoculation and the eventual emergence of shiitake mushrooms, making it a pivotal aspect of the cultivation process.
Monitoring Mycelium Growth: After successful inoculation, regular monitoring of mycelium growth is paramount. Keep a watchful eye on the inoculation sites and the surrounding areas for signs of healthy colonization. The appearance of white mycelial threads is a promising indication that the mycelium is thriving and spreading within the logs.
Pest and Contamination Prevention: Preventing pests and contamination is a priority during this phase. Inspect the logs for any signs of pests or unusual growth, and promptly address any issues that arise. Proper storage, hygiene, and maintaining a clean cultivation area are crucial in preventing the intrusion of unwanted organisms that could jeopardize mycelium growth.
Moisture Management: While maintaining moisture is important, excess moisture can lead to mold growth or other issues. Strike a balance by ensuring the logs remain adequately hydrated without becoming overly wet. Adjust watering or misting as needed, and take note of the logs’ appearance and feel to gauge their moisture level.
Minimizing Disruption: During post-inoculation care, aim to minimize disturbances to the logs and the mycelium. Avoid moving or handling the logs unnecessarily, as this can disrupt mycelium growth. Maintaining a stable environment helps the mycelium establish itself without unnecessary setbacks.
Continued Nutrient Release: As the mycelium continues to colonize the logs, it extracts nutrients from the wood through enzymatic breakdown. This ongoing nutrient release sustains the mycelium’s growth and lays the groundwork for the eventual development of shiitake mushrooms.
Mycelium Strength and Resilience: A well-cared-for mycelium network becomes robust and resilient. The stronger the mycelium, the better it can withstand challenges and environmental changes, ensuring a more successful transition to the fruiting stage.
Transition to Fruiting Stage: Post-inoculation care acts as the precursor to the fruiting stage. Once the logs are fully colonized by the mycelium, they are ready to transition to the next phase of development. This marks the exciting transition from mycelial expansion to the initiation of shiitake mushroom formation. For shiitake mushrooms grown outdoors on logs, the transition to fruiting typically occurs when temperatures change during the transitions from winter to spring, and from summer to autumn.
Harvesting and Enjoying Your Shiitake Bounty
After 12-18 months of growth, your mycelium will reach the eagerly anticipated phase of fruiting. This is the time for harvesting and savoring the fruits of your shiitake cultivation labor. The moment you’ve patiently awaited has arrived, and it’s time to gather the exquisite mushrooms you’ve nurtured from inoculation to fruition.
Determining Harvest Readiness: The first step in harvesting shiitake mushrooms is determining their readiness. Shiitakes are best harvested just before the caps unroll fully, usually when they are 1.5 to 4 inches in diameter. Gently press the caps to check for firmness and readiness. At this stage, the gills should be visible but not yet exposed.
Harvesting Technique: Using a sharp knife or scissors, cut the shiitake mushrooms at the base of the stem. Avoid pulling or twisting the mushrooms, as this can damage the delicate mycelium network within the log. A clean cut ensures that the mycelium remains intact for potential future flushes of mushrooms.
Harvesting in Flushes: Shiitake mushrooms tend to grow in flushes, with multiple mushrooms emerging from the same log over a period of time. Harvest the mature mushrooms in each flush and leave behind the smaller or underdeveloped ones. This allows the mycelium to allocate its resources more effectively, contributing to healthier future flushes.
Storing Shiitake Mushrooms: Freshly harvested shiitake mushrooms can be stored in the refrigerator for up to a week. To maximize freshness, store them in a paper bag or a container with a breathable lid. Avoid sealing them in airtight bags, as mushrooms need some airflow to prevent moisture buildup.
Culinary Creativity: Once harvested, your shiitake mushrooms are ready to grace your culinary creations. Their rich, umami flavor and meaty texture make them a versatile ingredient in a myriad of dishes. From stir-fries and soups to risottos and omelets, shiitakes add depth and complexity to a wide range of recipes.
Drying and Preserving: If you find yourself with an abundance of shiitake mushrooms, consider drying or preserving them. Dried shiitakes can be rehydrated and used in cooking, adding a concentrated burst of flavor to dishes. Preserving in oil or vinegar also extends their shelf life and provides gourmet options for later use.
Conclusion
From understanding the symbiotic dance between shiitake mycelium and the logs they colonize to creating the perfect environment for growth, you’ve learned how to nurture the life cycle of shiitake mushrooms. Every decision you make, from choosing the right logs to maintaining ideal conditions, contributes to the success of your cultivation venture.
Remember, shiitake cultivation is an art that blends scientific understanding with intuitive wisdom. It’s a practice that mirrors the cycles of nature, demonstrating the harmony between our aspirations and the Earth’s rhythms. By immersing yourself in this journey, you’re not only cultivating delicious mushrooms but also deepening your connection to the natural world and your own capacity as a steward of the land.
As you harvest those first shiitake mushrooms and savor their flavor, you’ll taste more than just the fruit of your labor. You’ll taste the care you’ve poured into each stage, the patience you’ve exhibited, and the curiosity that has fueled your exploration. You’ll taste the essence of nature’s collaboration with your intentions, resulting in a bounty that nourishes both body and soul.
Be sure and visit our list of articles for more great info on sustainable living, as well as edible and medicinal plants.
FAQs:
Q: What time of year do you inoculate shiitake logs?
A: Shiitake logs are best inoculated during the spring or fall seasons when the weather and humidity are conducive to mycelium growth.
Q: How do you prepare logs for mushroom inoculation?
A: To prepare logs, select healthy hardwood logs, age and condition them, pre-soak to rehydrate, create inoculation sites by drilling holes, introduce shiitake spawn, and seal holes with wax to prevent contamination.
Q: How long does it take for shiitake to grow on logs?
A: After inoculation, it typically takes several weeks to months for shiitake mycelium to fully colonize the logs. The first harvest may occur within 6 to 12 months, but typically it will occur within 12-18 months of inoculation, depending on environmental conditions.
Q: What is log inoculation?
A: Log inoculation is the process of introducing shiitake mushroom spawn (mycelium-infused substrate) into prepared hardwood logs, initiating the colonization process and eventual shiitake mushroom growth.
Q: How often can you shock shiitake logs?
A: Shiitake logs can be shocked to induce fruiting after the first flush of mushrooms. It’s usually recommended to wait at least 8 weeks before shocking the logs again.
Q: Can you inoculate logs in the fall?
A: Yes, fall is an ideal time for shiitake log inoculation. The cooler temperatures and higher humidity create favorable conditions for mycelium growth.
Q: What logs are good for shiitake plugs?
A: Hardwood logs from trees like oak, maple, and beech are ideal for shiitake plugs. Logs with diameters of 8 inches and larger are commonly used.
Q: What is the best wood to inoculate mushroom logs?
A: Oak is considered one of the best woods for inoculating mushroom logs due to its durability and nutrient content. Other hardwoods like maple and beech are also suitable.
Q: How many shiitake plugs per log?
A: The number of shiitake plugs per log depends on the log’s diameter. Generally, you can use 20 to 40 plugs for a 3-foot log with around an 8-inch diameter.
Q: Should shiitake logs touch the ground?
A: Shiitake logs should not be directly in contact with the ground. Elevate them slightly using logs, bricks, or other supports to prevent moisture retention and potential contamination.
Q: Do I need to water my shiitake logs?
A: Regular watering is not usually necessary if the logs are properly pre-soaked during inoculation. However, during dry periods, you may need to mist the logs to maintain humidity.
Q: Can you inoculate mushroom logs in summer?
A: Inoculating logs in the summer can be challenging due to higher temperatures and potential moisture loss. It’s generally recommended to inoculate logs in the cooler seasons of spring or fall for better success.